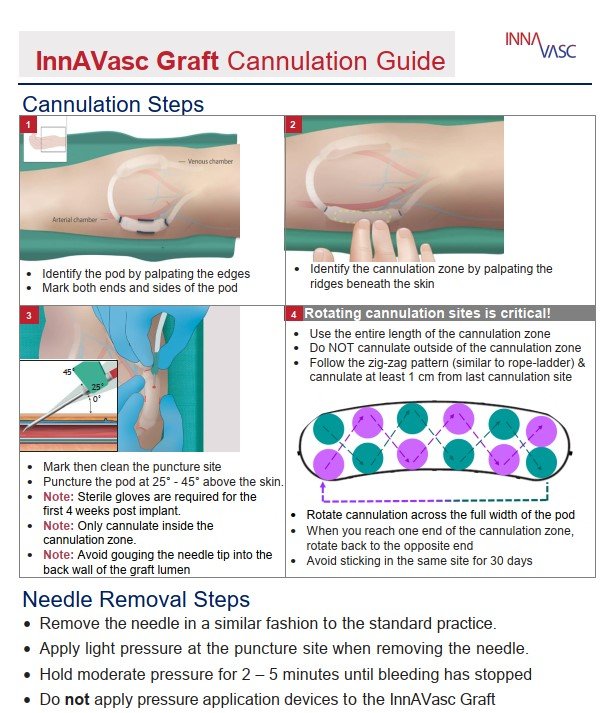
Cannulation Steps
Accessing the device for hemodialysis
The InnAVasc Device may be accessed for hemodialysis immediately post implant.
Special considerations for early cannulation:
Adherence to aseptic technique is important. InnAVasc suggests the following practices for cannulation in the early postoperative period:
Local anesthesia
Graft movement prevented during cannulation
Swift, clean puncture with a small (17 gauge or 16 gauge) needle
Reduced blood flow (200-250 ml/min) for the entire session
Administration of low-dose heparin
Access for hemodialysis
1. Begin by identifying the two cannulation pods by manual palpation of the InnAVasc Device.
a. Identify the cannulation zone within each pod by palpation of the raised surface on the anterior face of the cannulation pod (ends and sides). A mark may be placed at each end and on either side of the cannulation zone. A mark may be used to note the puncture site.
Note: Each pod must be accessed within the cannulation zone.
2. The puncture site should be cleaned. Puncture in a fresh area of the cannulation zone, at least 1 cm from the previous dialysis session cannulation site.
a. Use the entire length and width of the cannulation zone for subsequent punctures.
b. Follow the standard rope ladder technique, cannulating at least 1 cm from last cannulation site.
c. Avoid sticking in the same site for 30 days.
3. Limit 1 needle per cannulation pod (1 arterial, 1 venous).
a. Do not attempt to puncture the graft if the cannulation zone cannot be clearly identified.
4. As with standard grafts, care should be taken to minimize the chance of puncturing the back wall of the graft during needle insertion.
a. If the needle encounters excessive resistance (i.e., striking the backplate), stop advancing the needle immediately and slightly withdraw to access the graft lumen.
5. Following hemodialysis, apply manual pressure over the needle insertion site (which may not be directly under the skin puncture site) for 2-5 minutes, or until successful hemostasis is achieved.

